**** WE ARE CURRENTLY RUNNING APPROXIMATELY 2 TO 3 WEEKS OUT FOR PROCESSING AND PACKING **PLEASE REMEMBER THAT SHIPPING TIMES YOU ARE QUOTED AT CHECK OUT ARE TRANSIT TIMES ONLY (how long it should take to get to you once the carrier has picked up your package), THIS DOES NOT INCLUDE PROCESSING AND PACKAGING TIME**. As always we thank you for your business and your patience. 9/14/26 Dismiss
How to Replace a Bathtub in a Mobile Home Without Damaging the Floor
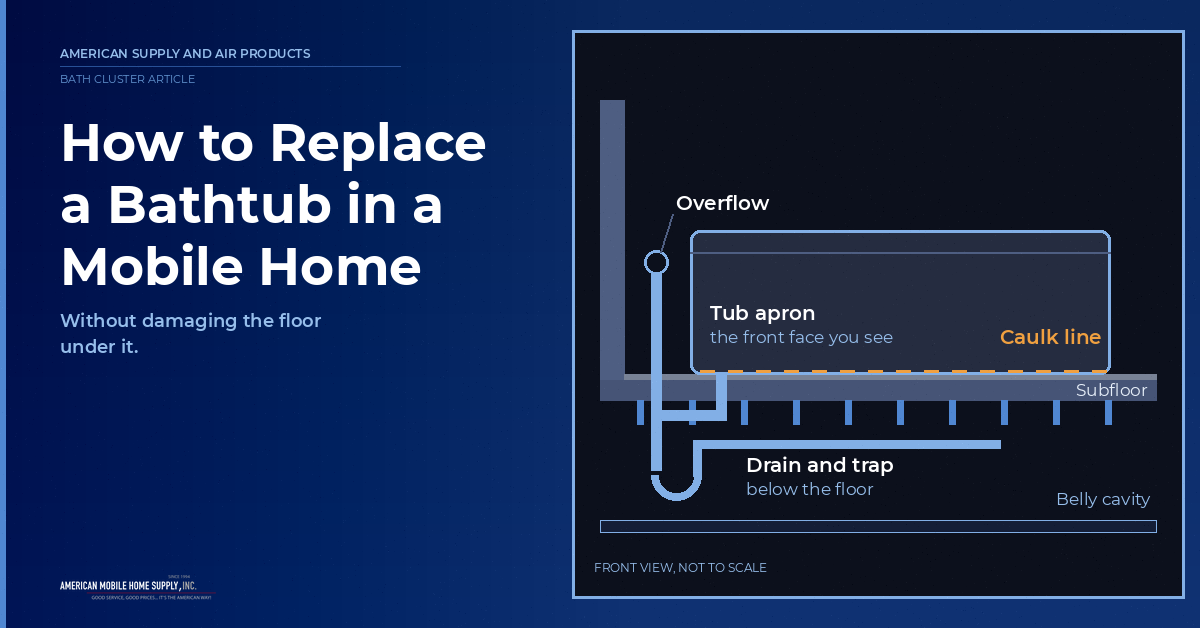
Replacing a bathtub in a mobile home is not as simple as pulling out the old tub and sliding a new one into place. The bathroom doorway may not be wide enough to remove the old tub intact. Years of moisture can leave the flooring around the tub soft, and the drain connections may sit below the floor in the shallow belly cavity. Even the replacement tub has to match the existing opening and plumbing, or the installation can turn into a much larger project.
If you are figuring out how to replace a bathtub in a mobile home, the order of the work matters. This guide covers how to measure for the replacement, remove the old tub without damaging the surrounding walls or floor, deal with the drain and plumbing connections, and install the new tub so it stays level and watertight. It also explains where a straightforward DIY replacement ends and where professional help may be needed.
Get the Right Replacement Tub Before You Start
Choosing the replacement tub is where you want to slow down and measure twice. A tub can look like the perfect match online and still arrive with the drain on the wrong side or an apron that does not line up with the existing opening. Getting the measurements right before ordering saves you from turning a simple replacement into a return-and-reorder headache.
Measure four things from the existing tub before you order
1.Overall length from the apron to the back wall
2.Width from the front apron to the wall behind the tub
3.Apron height from the floor to the top edge of the tub apron
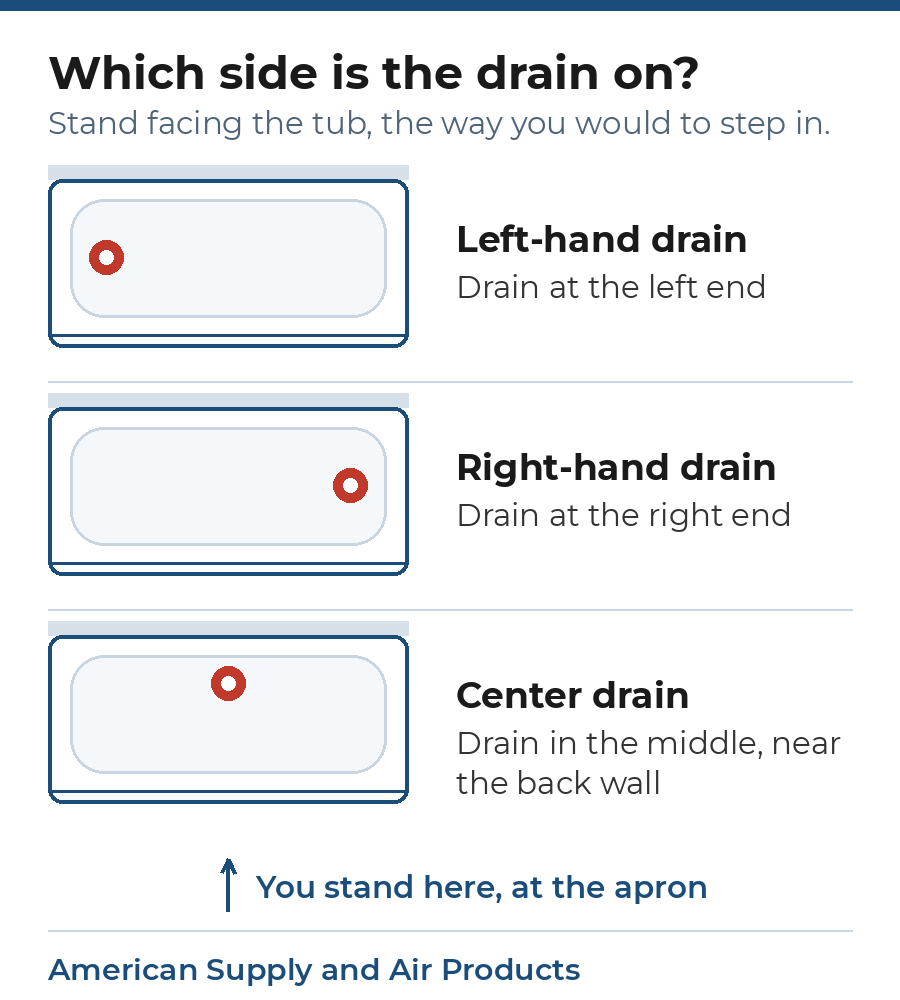
4.Drain location: left, right, or center when you face the apron looking down
Most mobile homes use 54-by-27-inch tubs, with 54-by-30-inch models available when you need a little more room. A mobile home garden tub replacement may be the better fit for a larger primary bathroom, but the same measuring rule applies: check the opening and drain location before you place the order. Guessing here can leave you with a tub that looks right on paper but does not line up in the bathroom.
Stand at the front of the tub, the way you would to step in. The drain side you see is the one to order.
The tub material matters, too. Fiberglass is usually the lightest and easiest option for a one-person job. Acrylic adds some weight but generally holds up better against scratches. Reinforced tubs are heavier and usually need two people to move safely. For a DIY replacement, fiberglass is often the easiest to handle.
When shopping, look for a supplier that carries tubs made for mobile homes rather than assuming a standard tub from a big-box store will fit. Our mobile home bathtubs range includes 54-by-27 and 54-by-30-inch models with left-, right-, and center-drain configurations.
Plan the Removal Path Before You Cut Anything
If you are working out how to replace a tub in a mobile home, here is the choice that saves the most time later: cut the old tub in place, or open a wall to carry it out whole?
Cutting in place works for fiberglass and acrylic tubs almost every time. Score the tub into two or three sections with a reciprocating saw or an oscillating multi-tool, then lift each piece through the doorway. Fiberglass cuts cleanly, throws no dangerous shards, and comes out in about thirty minutes once the plumbing is disconnected. Opening a wall makes sense only for a cast iron or heavy reinforced unit that will not cut, and most owners skip that route because the added wall repair uncovers other issues.
Before cutting, check the subfloor under and around the tub. Press down at the apron, along the wall behind, and around the drain. If those areas feel soft, rot has already spread underneath, and fixing bathroom floor in mobile home has to happen before this job continues. A new tub set over compromised framing shows up as a leak within a year. The tub is usually the biggest single piece in a mobile home bathroom renovation, and once it comes out, the surrounding fixtures often follow within the same project window.
Remove the Old Tub Without Damaging the Floor
If you are learning how to install a tub in a mobile home, removal is an important part of the job. Take your time here. Rushing can damage the floor or the wall around the tub and create extra repairs before the new one goes in.
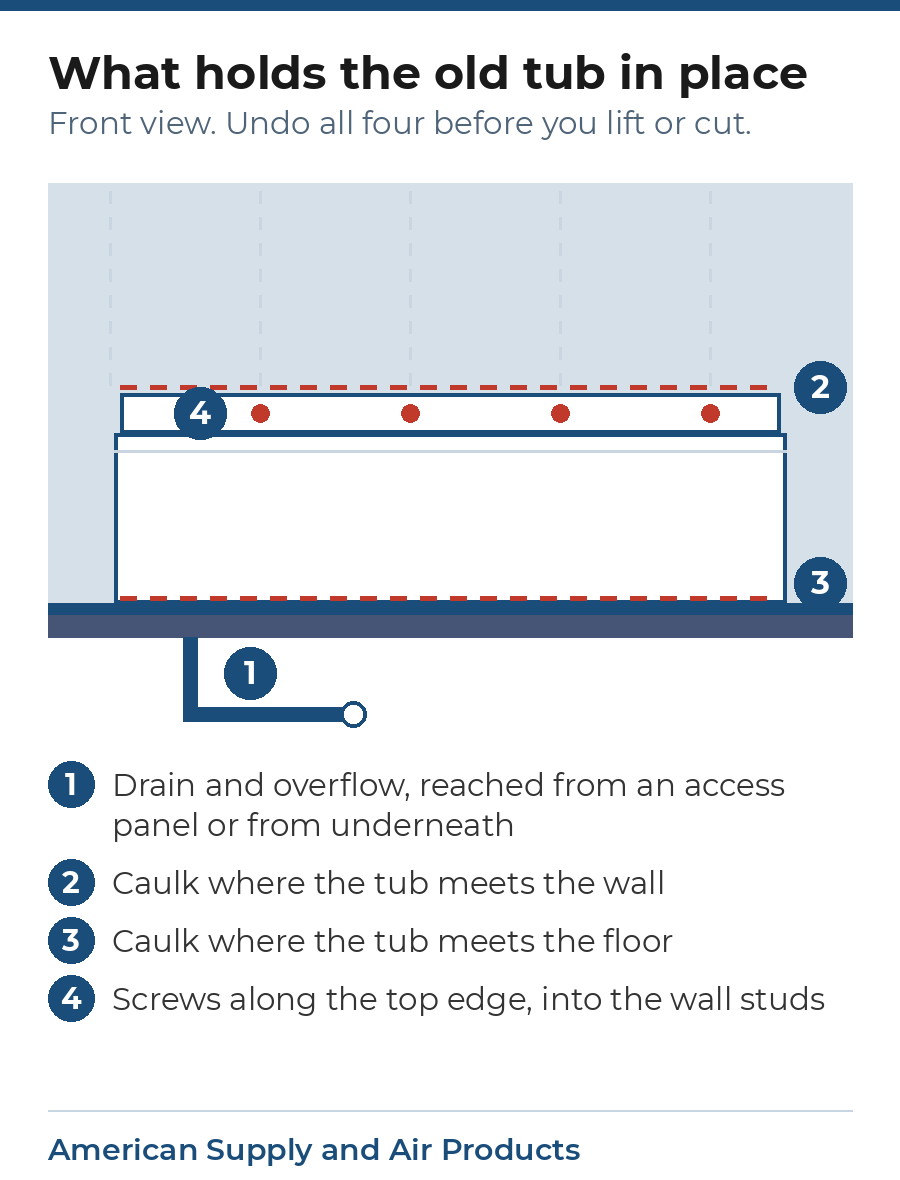
Undo all four before you lift or cut. A tub still held by caulk or screws is how floors and walls get damaged.
Turn off the water. Shut off the bathroom water valves. If there are no separate valves, turn off the home’s main water supply. Open the tub faucet for a few seconds to drain the pressure, then make sure the water has stopped.
Disconnect the drain and overflow. Look for an access panel behind the tub. If there is one, use it to reach the drain connections. If not, you may need to reach them from underneath the mobile home. Remove the drain connection and the overflow cover and make sure the tub is no longer connected to the plumbing.
Cut through the caulk. Run a utility knife along the caulk where the tub meets the wall and floor. Do not try to pull the tub free while the caulk is still holding it in place. You could damage the floor or surrounding walls.
Remove the screws holding the tub in place. Check along the top edge of the tub where it meets the wall. Remove any screws or fasteners securing the tub to the wall framing.
Take the tub out. If the old tub is small enough to remove through the doorway, have someone help you lift it out. If it will not fit, cutting it into smaller pieces may be easier. Make two horizontal cuts through the sides and another across the back, then remove the pieces one at a time.
Protect the floor while cutting. Wear eye protection and a dust mask. Keep the blade shallow so you do not cut into the floor underneath the tub.
The subfloor under the tub is often the weakest in the bathroom
Do not stand inside the tub area during removal, even briefly. Years of humidity around the apron and drain leave the subfloor soft enough to give way under weight. Keep your feet on solid flooring outside the tub footprint and lift each cut section out from the side.
Set the New Tub and Seal It Properly
Once the old tub is out, take a few minutes to make sure the new one actually fits before you fasten anything. A dry fit is the most important step in how to install a bathtub in a mobile home, and it can save a lot of work later.
Test-fit the tub. Set the new tub in place and check that the drain lines up with the existing plumbing. Make sure the top edge sits flat against the wall framing and the apron rests evenly on the floor. If something is off, fix it before moving on.
Support the bottom of the tub. Some fiberglass tubs have molded feet that support the base. If yours does not, place a thin bed of mortar underneath it. This helps support the tub and keeps the bottom from flexing when someone stands in it.
Set the tub level. Press the tub into place and check it from side to side and front to back. Small shims can correct a slight tilt, but do not use them to make up for a major fit problem.
Connect the drain and overflow. Make the drain connection through the access panel or from below the mobile home, depending on your setup. Use the gasket or plumber’s putty specified for your drain, then tighten the connection without forcing it.
Check for leaks before securing everything. Put a small amount of water in the tub and watch the drain and overflow connections. It is much easier to fix a leak while you can still reach everything.
Secure the tub. Once the connections are dry, fasten the tub to the wall framing using the existing screw locations. Do not overtighten the screws. Too much pressure can crack a fiberglass tub.
Seal the edges. Apply mildew-resistant silicone where the tub meets the floor and where the top edge meets the wall. Give the sealant enough time to cure before using the tub.
If the old surround has yellowing, water stains, or bulging areas, replacing it at the same time is worth considering. Installing a new surround is much easier while the tub is already out. You can find suitable tub and shower surrounds for the project.
While the water is still off, check the toilet fill valve as well. If the toilet has an older float-ball setup or the valve drips or makes noise while the tank fills, this is a convenient time to replace it. An Adjustable Anti-Siphon Fill Valve adjusts from 8 to 13 inches and can be used as a replacement for many older toilet fill valves.
Ready to order the tub but not sure which size fits?
Read us the four measurements from the info box above and the drain location, and we will confirm the right tub before you commit. Supplying manufactured home parts since 1994.
How long does the whole tub replacement usually take?
For a first-time mobile home garden tub replacement, plan on a full weekend if everything goes smoothly. You can usually handle the removal on the first day and install the new tub on the second. If you find subfloor damage after removing the old tub, allow another day for the floor repair, plus enough time for any adhesive or mortar to cure before setting the new tub.
What kind of caulk holds up best around a bathtub?
Use 100% silicone caulk rated for kitchen and bathroom use, preferably with mildew resistance. It stays flexible as the tub shifts slightly with normal use and holds up better around a wet area than latex or acrylic caulk. Applying silicone neatly takes a little practice, so take your time when sealing the edges.
Can I install a walk-in shower where the bathtub was?
In most cases, yes, but the shower pan drain usually sits in a different spot than the tub drain, which means rerouting the drain through the belly cavity. That step crosses into licensed plumber territory for most owners. The floor framing may also need reinforcement to carry a tiled pan.
Do I turn the water off to the whole house, or just the bathroom?
The bathroom shutoff valves, if your bathroom has them (most do). If yours does not, or if the valves will not close fully, shut off the main water supply during removal and install. Working around a slow drip makes every other step harder.
Do the new tub screws go through the flange into the studs, or into the wallboard?
The screws should go through the tub flange and into the wall studs. Wallboard alone is not strong enough to hold the tub securely. Before installing the new tub, locate the studs so you know where to fasten it. If the previous tub was secured only to the wallboard, add wood blocking between the studs before installing the replacement.