How to use sea tech fittings
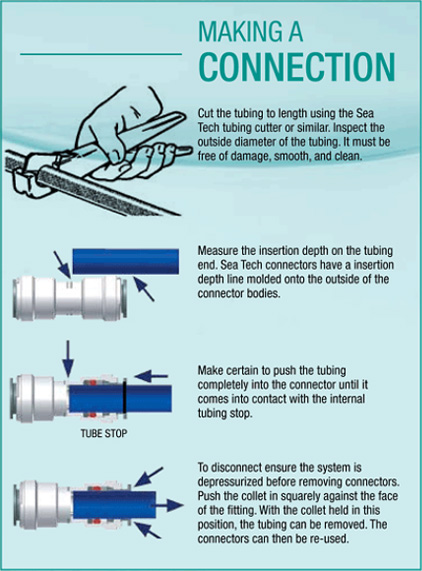
With Sea Tech’s unique, patented, reliable, leak  free fittings, valves, manifolds and tubing, plumbing of water systems has never been easier. Through thousands of hours of testing sea Tech has developed reliable,leak free, fittings, valves, and mani-folds that significantly reduce installation labor and save cost. Because Sea Tech products do not require any special tools for installation these products are the ideal choice for OEM and user applications. Only Sea Tech’s state of the art design allows for a simple “snap” connection to PEX (plastic), CPVC, and copper tubing. Fittings are quickly and easily installed without any special tools, compres-sion sleeves, nuts, adhesives, welding, clamps, or crimps of any kind.
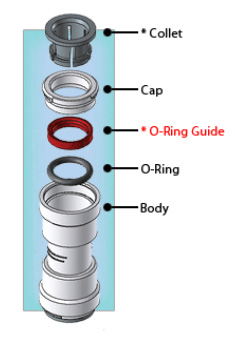
Why it works … O-Ring Guide is the Key
All Sea Tech connectors incorporate an exclusive O-Ring Guide for improved reliability. Tshis unique features insures zero-leak connections by:
Protecting the O-Ring from damage during connection Increasing the connector’s side load capacity Correctly aligning the tubing with the O-Ring every time Prevents the O-Ring from becoming dislodged *Patent Pending Collet Design & O-Ring Guide
American Supply
Good Service, Good Prices, It’s the American Way!
How to use flair-it fillings

How to Measure and install your mobile home door
How to Measure For Your Door
There are many ways to measure for a door replacement. We recommend you measure your rough opening and select the replacement size that is closest to it.
For example, your rough opening measures 32 ¼” x 76 ¼”, ALWAYS BACK DOWN TO THE NEAREST SIZE and order size 32″ x 76″.
To determine if your door is right or left-handed, simply look at it from the outside of the home to see which side the hinges are on.
- Make certain all mounting surfaces (siding seams included) are securely fastened and flat around perimeter of door opening.
- Apply a suitable non-hardening sealant tape to the back side of the doors mounting flange.
- Do not remove any shipping clips or fasteners and keep the door closed and locked during the installation. Opening the door prior to the installation will destroy the pre-squaring by the door manufacturer.
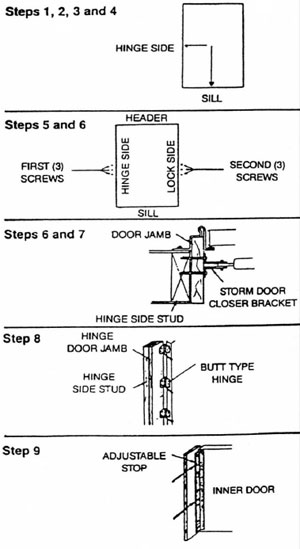
- Insert the door assembly carefully into the rough opening. Make certain the door sill is secure on the floor. Move door to hinge side until it is firmly against hinge side stud.
- Proceed to fasten door with screws. Drive the first three (3) screws into the outer frame in the middle at the hinge side. Then drive the next thirty (30) screws in the middle of the outer frame on the lock side. Then secure the balance of the hinge side, across the sill, up the lock side and the header.
- Remove the shipping clips and open the door. Install the hardware for the door.
- If it is a house-type door with storm door make certain two (2) long screws are put through the storm door plunger bracket fastened to the jamb. This is to anchor the bracket securely to your hinge side stud.
- If the house-type inner door is secured to the outer frame with butt type hinges (six-panel steel doors only), run one long screw through each hinge on the jamb side to penetrate the hinge side stud.
- The house-type door has an adjustable stop, adjust the stop to the exterior of the inner door to insure a good seal.
If the above steps are followed the door will be sealed and operate properly.
How to install skirting
Installing vinyl skirting can be done quite easily. Professional installers may have your home skirted much quicker than the individual homeowner but if you have the time doing it yourself will save you some money. Below you will find some basic installation instructions. It is up to the purchaser to ensure that the skirting is installed properly and in accordance with any applicable building codes. These instructions are simply a guide and assume no liability for improper installation or possible personal/property injury/damage resulting from improper use or installation.
You will need:
A hammer, level (or plumb bob), measuring tape, tin snips, and a chalk line…and of course the vinyl skirting panels, trim kit (which includes the top back rail, top front rail, & ground channel), and hardware kit that you purchased from American Supply.
 1. The first piece to install is the Top Back Rail. Place it at the base of the home (make sure it is level—snapping a chalk line around the home will help ensure that it is all straight) and fasten it to the home with the 1″ hex-head screws that came in your hardware kit. Continue installing the top back rail around the perimeter of the home. For the corners you will need to make a 1 inch vertical slit from the top. The top interlock hook should be completely cut through and notch 45 degrees on the bottom curved leg.
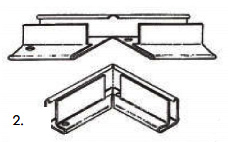
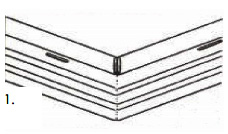 2. The next piece to install is the ground channel. Make sure the ground directly under the top rail and edge of your home is clear of any obstructions. Use a level or plumb bob to ensure a straight drop from the top back rail and edge of your home to the ground. Again, snapping a chalk line around the home will help ensure that you stay in a straight line. Lay out your ground channel and secure it to the ground with the 8″ spikes that came in your hardware kit. For the corners simply notch the back portion with the tin snips as shown in the picture (left) and bend around corner, then attach to the ground with spikes as you did with the rest of the ground channel.
 3. Now you start to really see your progress come to life. The next pieces to install are the panels. Measure from the ground channel to approximately 2″ above the bottom edge of the top back rail (to allow for attachment and also expansion and contraction). If the ground is not level cut the bottom of the panel to angle with the ground. Cut each section to size. Place the bottom edge of the panel in the ground channel and rest the top against the top back rail. Some installers will leave the panels this way, others prefer secure the sections with screws (not included in your hardware kit, but are inexpensive and sold locally and at American Supply). For the corners measure as usual and determine where the panel will need to be bent. Simply bend the panel over a board or table to make a straight bend and install as usual.
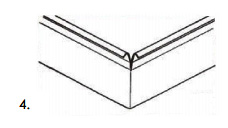 4. The final piece to install is the top front rail. Place the top front rail into the top back rail (with the panel between) at an angle and pushard with the heel of your hand to snap it in place. Continue around the home overlapping each top rail section approximately 1-1 1/2 inch. For corners notch both the top and bottom hooks as shown in the picture (left) bend around corner and install as usual.
3A Eagle Skirting